(
(
[3.12] PoE Heist Gladiator Bleed Puncture Duelist Tank Build (PC,PS4,Xbox,Mobile)
This PoE 3.12 Duelist Bleed Puncture Gladiator Build features a reasonably tanky and well-rounded character capable of tackling all of the content this game has to offer. It uses Rain of Arrows for map clear and Puncture for single target damage, with bleed being the primary damaging mechanic.
![[3.12] PoE Heist Gladiator Bleed Puncture Duelist Tank Build (PC,PS4,Xbox,Mobile)](https://dhost1.mmomiss.com/uploads/202009/PoE Heist Gladiator Bleed Puncture Duelist Tank Builds.jpg)
Quick Jump
Pros & Cons
- + Good clear speed and single target
- + Quite tanky thanks to dodge, evasion, corpse removal and Purity Sentinels (bodyguards)
- + Bleedsplosion popcorn sound
- + Relatively cheap to get started
- + Decent but not great for beginners, SSF and league start
- + Almost hardcore viable, almost
- + Reaches around 6000 life
- - Requires few key items to really start rolling
- - Puncture might feel sluggish
- - End game gear is very expensive
- - Can be hard to optimize
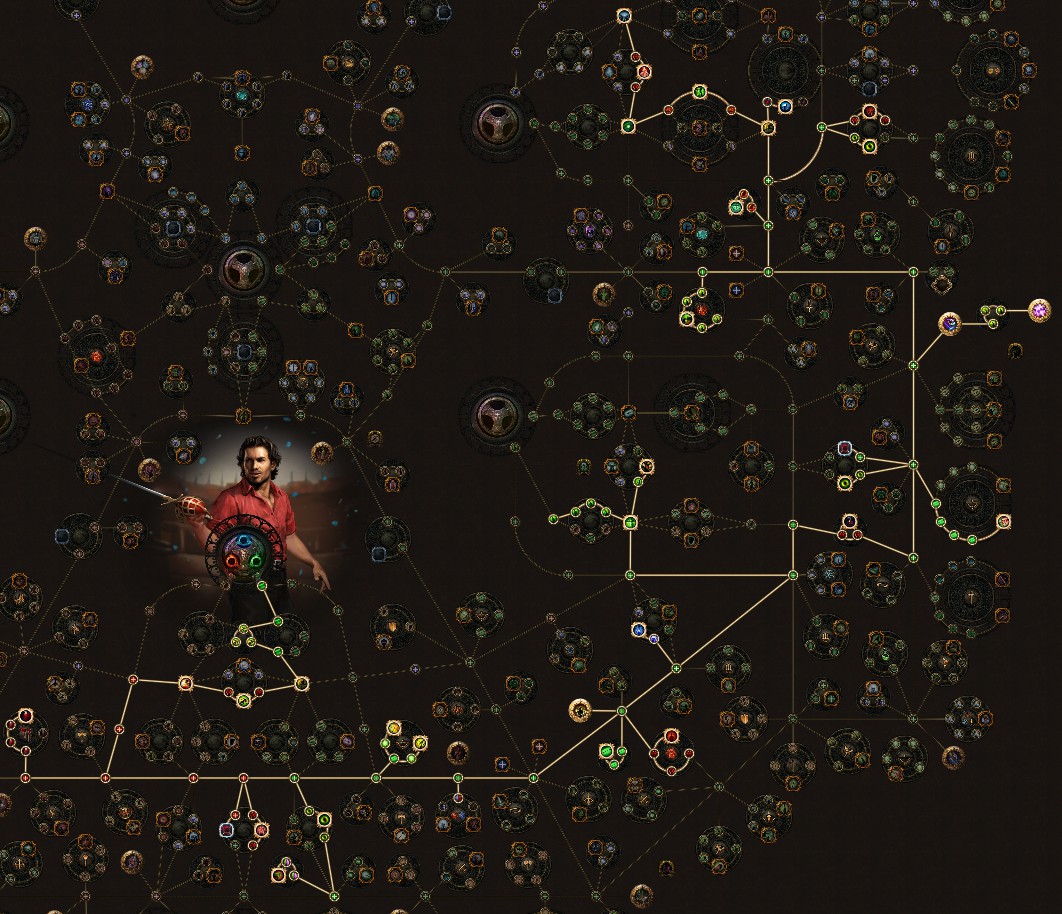
Skill Tree
Ascendancy: Gratuitous Violence -> Arena Challenger -> Outmatch and Outlast
Pantheon
Major God: Soul of Lunaris
All around best god for evasion based builds. Extra speed is avoidance is always welcome. Solaris and Arakaali can be used too, but Lunaris is what i recommend.
Minor God: Soul of Ryslatha OR Ralakesh
Minor one are more preference based, you can pick almost anything, really. Ryslatha is always a good option for builds that use instant flasks to quickly heal up a big hit. Also really useful for labyrinth.
Ralakesh is very viable option. Corrupted blood is one of the most troublesome mechanics i've encountered while playing. Reduced damage and chance to avoid might help in tough situations.
Bandit: Oak (recommended) OR 2 passive points
Passive Tree & PoB
Path of Building Link: https://pastebin.com/DTVkypWM
Gems Setup
Main Skill
Vaal Rain of Arrows - Chance to Bleed - Brutality - Deadly Ailments - Vicious Projectiles - Maim
Rain of Arrows has very wide area of coverage and often hits enemies multiple times. It doesn't deal high amounts of damage, but it's sufficient to quickly clear groups of enemies. Multiple hits mean it's more resilient to certain map mods and running out of mana.
The biggest strength of the skill is the Vaal version, which is the hardest hitting clearing bow skill for bleed. It also inflicts very strong slowing effect and can be used in variety of ways. Recharges very quickly.
Single Target
Puncture - Chance to Bleed - Brutality - Deadly Ailments - Vicious Projectiles - Unbound Ailments - Swift Affliction
Dedicated bleed skill with massive damage multiplier, perfect for single target. It's gonna be your go-to choice against any tough enemy. Grants flat physical damage too, making the progression smoother.
There's one big drawback and it's the 70% attack speed multiplier, causing it to feel sluggish. It's partially resolved with Gladiator's Arena Challenger notable.
Swift Affliction can be used as an optional link but not recommended. Unless you deal very high amounts of damage, Unbound Ailments is a better option. The extra duration gives a lot of room for dodging and applying other debuffs on enemy. This is true especially against very tanky bosses.
Classic version of the build uses Siege Ballista instead with the same support gems. It can be found in End Game Build section.
Debuffing Setup
Ensnaring Arrow - Barrage - Curse On Hit - Vulnerability
Absolutely necessary bossing setup. Ensnaring arrow makes slowed enemies to always take extra 200% more damage from bleeding, which normally happens only if they're moving. It's a vital tool to bring down bosses quickly, plus it's an amazing kiting tool. The setup also curses enemies on top of that.
In order for Ensnaring Arrow to work you CANNOT have pierce, fork or chain on your gear or passive tree.
Frenzy Generation/Upkeep
Blood Rage - Frenzy
Blood Rage is a natural choice. Attack speed is great, physical leech is perfect for this build and frenzy generation during mapping is insanely easy.
For bosses you'll have to use Frenzy skill to generate charges. There are optional ways to automate frenzy charge generation which can be found in End Game Build section.
Guard Skill
Steelskin - CWDT
Steelskin for extra durability. If manually cast, it's great for any encounter. If you're lazy and linked Steelskin with CWDT, it protects you from multiple hits in quick succession. The entire setup is optional, but recommended nonetheless.
Primary Aura
Grace, Malevolence, Pride
You have to choose ONLY ONE aura. You won't be able to sustain more than that unless you invest in specific gear. What auras offer and when you should use each one:
Grace - grants extra evasion. Default aura for levelling and early maps. Loses impact later on.
Malevolence - grants up to 20% more damage with bleeding. Default damage aura since it works regardless of distance. Watcher's Eye mods for this aura are amazing.
Pride - nearby enemies take up to 39% more physical damage. Superior clearing aura and works for hits, bleed and corpse explosion damage. Pride requires you to stay in close-mid range to enemy in order to work.
Other Reservation Skills
Herald of Purity grants small amount of added physical damage. The more important part are the minions who will block projectiles, draw monster aggro and tank enemies.
Blood and Sand is used solely to generate Challenger stacks from Gladiator's ascendancy node. You will have to switch stances during mapping in order to maintain maximum stacks.
Optional reservation setups can be found in End Game Build section.
Movement Skill
Used to cross gaps and escape tough situations quickly. Your primary way of moving around is still on foot.
This marks maximum amount of gems you can have inside your gear. To include any optional gems you'll have to sacrifice something, use Unset Ring or replace the setup in some other way.
Gear Setup
IMPORTANT: YOU CANNOT HAVE PIERCE/FORK/CHAIN ON YOUR GEAR
Bleeding Bow
22% increased Elemental Damage with Attack Skills
-----------------------------------------------------------------------
Socketed Gems are Supported by Level 18 Vicious Projectiles
125% increased Physical Damage
Adds 38 to 59 Physical Damage
+2 Life gained for each Enemy hit by Attacks
10% chance to cause Bleeding on Hit
26% increased Damage with Bleeding
60% chance for Bleeding inflicted with this Weapon to deal 100% more Damage
The core item of this build. The ideal bow needs:
- 60% chance for Bleeding inflicted with this Weapon to deal 100% more Damage
- High physical damage
- High attack speed
Everything contributes to damage and smoothness. The first mod is the highest damage mod you can get from gear, but it appears on Elder influence weapons. Before you get your hands on one it's recommended to use any high physical damage bow.
You will most likely have to craft your own bow. It requires a lot of resources to craft almost perfect bow, so don't be afraid to stop at mediocre damage rolls. End game version of the bow would use Elder+Hunter's influence combo for faster bleeding mod.
Details how to craft it can be found in crafting section.
Body Armour
Rare Body Armour
+34 to Dexterity
+74 to Evasion Rating
+135 to maximum Life
Regenerate 6.3 Life per second
+38% to Cold Resistance
8% increased maximum Life
8% increased maximum Mana
High level chests can give you really high amount of life on top of other potential bonuses. Well crafted influenced body armours in particular can be amazing. Elder armour especially has some really useful mods for defence. Redeemer's influence has a mod that automates frenzy generation/upkeep on bosses.
My personal choice of body armour. I use it to mitigate potential oneshots from bosses, and it saved me multiple times in the past. Additional 50% evasion if you get hit is a really nice bonus for mapping. The "20% Less Damage Taken if you've not been hit Recently" also works against degens (LAB TRAPS!) until you've been hit. It's quite reliable when you need it the most, but doesn't always protect you.
Optional body armour that automates frenzy generation if paired with Aspect of the Cat. Primarly used in classic build, but not limited to it. It's very expensive.
Quiver
Adds 6 to 12 Physical Damage to Bow Attacks
------------------------------------------------------
Grants Level 20 Aspect of the Cat Skill
+25% to Physical Damage over Time Multiplier
+97 to maximum Life
45% increased Projectile Speed
Adds 5 to 8 Physical Damage to Attacks
At the beginning, a rare quiver with life, resistances and added physical damage/speed mods is all you need.
As you approach end game you should consider crafting Hunter influenced quiver for extra damage DoT multipliers. Details how to craft it can be found in crafting section.
Helmet, Gloves and Boots
Glove
+29 to Evasion Rating
38% increased Evasion Rating
+108 to maximum Life
+12% to Fire Resistance
+43% to Cold Resistance
+43% to Lightning Resistance
Helmet
+13 to maximum Energy Shield
+24 to maximum Life
+39% to Fire Resistance
+41% to Cold Resistance
+45% to Lightning Resistance
+65 to maximum Life
Boot
Grants Level 20 Aspect of the Cat Skill
+80 to maximum Life
+40% to Cold Resistance
30% increased Movement Speed
+14% to Cold and Lightning Resistances
Packed into same category, as you want same thing from all of them:
- Life
- Resistances
- Movement Speed (boots only)
Evasion based preferred, especially the helmet (can achieve really high evasion). You should avoid ES based gear due to very low intelligence this build has. On top of that, gear with ES makes end game crafting much more difficult.
Optional End Game Uniques
Farrul's Pounce are unique gloves that are a core item in Classic build. Don't use them in main version of the build that focuses on Puncture.
Assailum is an optional helmet which gives a lot of damage in exchange for survivability and QoL. Used in main version of the build.
Details for both can be found in End Game Build section.
Enchantments
Gloves: of Spite
Nothing else is useful, really. You can totally ignore the gloves enchantments.
Boots:
#1 - 16% increased Attack and Cast Speed if you've Killed Recently
#2 - 8% chance to Spell Dodge if you've taken Spell Damage Recently.
#3 - 10% increased Movement Speed if you haven't been Hit Recently
All of them are really good, pick based on your preferences.
Helmet: Any Puncture / Rain of Arrows enchantment
To be fair, helmet enchantment doesn't matter at all in this build. There's tons of fine options but none of them is a clear winner. Just use whatever you prefer, including secondary skills/auras.\
Belt
Ryslatha's Coil: Core item of this build.
Ryslatha's Coil is basically a 20-30% more damage multiplier. 50 life on stun is really useful during the map clear, as the bleedsplosions often stun enemies around. It can also be corrupted for one of the very good vaal implicits:
- 6-8% increased maximum Life
- 14-16% to all Elemental Resistances
- 8-12% increased Attack Speed during any Flask Effect
- 8–12% increased Movement Speed during any Flask Effect
Rings and Amulet
Like majority of other gear and little bit more:
- Life
- Resistances
- Added physical damage
- ~60-70 Intelligence total
Steel rings are obviously the best for additional damage. However you should prioritize life/resistances first and then the damage, unless you have everything required. You can always mastercraft a little bit of added damage.
You'll need around 60-70 intelligence in order to use some gems. Jewellery is most likely where you'll get it from.
Amulet Annoinments
Cleaving - Black, Amber, Sepia
Cheap and very high damage notable. It might be for axes, but the 2 bleed nodes are global. You can also allocate "Growth and Decay" or "Dirty Techniques" notables instead, they grant slightly less damage but have some extra other effects that makes them worthile. They're more expensive tho. End game build version should use one of the alternatives, since it's passive tree includes Cleaving.
Thief's Craft - Amber, Sepia, Clear
Extremely cheap early mapping node. Extra 30 intelligence for easier gearing.
Hardened Scars - Golden, Black, Teal
Hidden notable. Strongest defensive node for ranged characters, grants Fortify. Requires a hybrid flask with "Foreboding" or "Enduring" prefix in order to work.
Discipline and Training - Silver, Silver, Black
Soul of Steel - Golden, Golden, Golden
If you prefer permanent life boots that's not tied to flask. Former node is better in nearly all scenarios, the latter is much stronger at mitigating physical damage.
Flask
1 life flask for emergencies and 4 utility flasks. Standard for most builds. The setups are flexible, use everything to your preferences.
From unique flasks:
The Writhing Jar - Great flask for end game bosses. Allows you to refresh frenzy charges during waiting phases (like Shaper).
Jewels
There's not much to discuss, you want any 3 out of these 5 mods on your jewels:
- 5-7% increased maximum life
- 16–20% increased Damage with Bleeding
- 14–16% increased Global Physical Damage
- 12–16% increased Bleeding Duration / Attacks have 3–5% chance to cause Bleeding
- +3-4% to Physical Damage over Time Multiplier
Life on the jewel is especially valued, get it if you can. Bleeding duration might seem useless, but it works like a dimnishing multiplier. Good to invest into it once or twice.
You also might want a single abyss jewel with chance to gain onslaught on kill, awesome for clearing.
Getting a jewel with all 4 good mods is kinda impossible, but finding one with 3 mods at once should be easy. Be sure to look out for other mods that can be beneficial for you:
- Attack speed mods
- 10–12% increased Damage over Time
- 8–10% increased Damage
- 0.2–0.4% of Physical Attack Damage Leeched as Mana
- 14–18% increased Evasion Rating
- Any resistance / intelligence mods
Watcher's Eye is an expensive jewel you might want to acquire once you reach the end game maps. It's capable of granting very high amount of damage and some extra defence/QoL. The mods you're interested in:
- +(18-22)% to Damage over Time Multiplier while affected by Malevolence
- Damaging Ailments you inflict deal Damage (10–15)% faster while affected by Malevolence
- Unaffected by Bleeding while affected by Malevolence
- (15–20)% increased Recovery rate of Life and Energy Shield while affected by Malevolence
Levelling and Progression
Bleed levelling (Act 1-10)
Gem Progression:
Split Arrow - Pierce - Chance to Bleed
Rain of Arrows - Chance to Bleed - Maim - Vicious Projectiles
Your levelling setups for first 3 acts. Split Arrow is going to be your clear skill for a short moment. Once you hit level 12 you can finally use Rain of Arrows which you'll stick with for the rest of the game.
Rain of Arrows - Chance to Bleed - Vicious Projectiles - Deadly Ailments OR Brutality
Your clearing setup after you finish normal labyrinth and respec to bleed.
You can use Deadly Ailments or Brutality depending on your 4-link colors.
Puncture - Chance to Bleed - Deadly Ailments - Vicious Projectiles OR Brutality
Additional setup for bosses. Hit once or twice and let the enemies slowly die to bleeding. Swap Vicious Projectiles for Brutality when you reach level 38 and have a suitable 4-link.
Ensnaring Arrow
Extra setup for single target. Use on immobile bosses in order triple bleeding damage from Puncture.
Vulnerability - Curses enemies to increase damage. Use on bosses, tough packs, rares etc.
Blood Rage - Frenzy generation and attack speed against normal enemies
Herald of Purity - Additional physical damage and Sentinels for drawing aggro. You'll need extra intelligence on gear in order to use it.
Blink Arrow: Your movement skill
Grace: Your aura, grants additional evasion.
Purity of Elements: If you REALLY need resistances. Use instead of Grace if necessary.
Passive Tree Progression
Level ~10 (Act 1) - Level ~22 (Act 2) - Level ~32 (Act 3) - Level ~32 (After Respec) - Level ~39 (Act 4) - Level ~45 (Act 5) - Level ~55 (Act 6-7) respec 2 bleed chances after cruel Labyrinth
Level ~70 (Blood Acqueducts farm) - Level ~71 (After Kitava)
Bandit Reward: Oak (recommended) OR 2 passive points
Ascendancy Order: Gratuitous Violence -> Arena Challenger -> Outmatch and Outlast
Gem Rewards:
- lvl 2 - Split Arrow
- lvl 3 - Pierce (Medicine Chest side quest)
- lvl 4 - Puncture
- lvl 8 - Maim
- lvl 10 - Blink Arrow
- lvl 12 - Rain of Arrows
- lvl 18 - Vicious Projectiles
- lvl 24 - Grace, Vulnerability (buy other one from Clarissa)
- lvl 38 - Greater Multiple Projectiles
Additional Gem Purchases:
- lvl 4 - Chance to Bleed (Act 1)
- lvl 18 - Ensnaring Arrow, Deadly Ailments (Act 2)
- lvl 38 - 2x Brutality (Act 4)
General Levelling Guidelines
First and most important to remember - when searching for an equipment, your priority on them is Life and Resistances. Links are equally as important, be sure to look out for correct socket colors. Upgrade potions regularely. This applies to all acts.
The exception to the "Life and Resistance" part is your bow. You'll have to upgrade it overtime to maintain high amount of physical damage. In case you cannot find a good rare bow, you can create one on a crafting bench inside your hideout starting from middle of act 3 when you find physical damage recipe. There is also a vendor recipe that gives similar but slightly weaker damage (sell to shopkeeper):
Bow + Blacksmith's Whetstone + magic/rare Rustic Sash
Any of these two methods should easily carry you through majority of the storyline. There are few very notable bases you should be crafting with this method:
Bone Bow (lvl 23, vendor recipe) -> Decurve Bow (lvl 38) -> Citadel Bow (lvl 58)
Starting from Decurve bow, use Whetstones on a white bow to increase it's quality.
Act by Act Guidelines
First 3 acts are trivial. Stack added physical damage early on since there's almost no danger. You'll be using normal attack based build as bleeding isn't very good just yet. Try to find Lapis Amulet before lvl 16, you'll need a little bit of intelligence to use Herald of Purity.
At level 32, after finishing act 3 and beating normal Labyrinth you can respec now inferior projectile nodes. You'll have to finish one of the side quests in Fetid Pool or Crypt to be able to remove all 4 nodes.
Once you fully convert to bleed, the playstyle will change massively. Majority of the monsters should die quickly, but those that don't move much will be huge pain in the ass. You'll be using Ensnaring Arrow to make them take full damage. It is absolutely to take them down quickly.
In act 4 it's important to have good resistances, especially fire resist. At level 38 after you breach the beast, you can buy Brutality support. It's a good idea to link it to your main skills, if you have right colours.
Act 5 is where things get little bit tougher. Monsters out there are quite dangerous and it's recommended to have capped fire and lightning resitances. It's also a time where bleed removal life flask becomes necessary. I suggest to farm Chambers of Innocence until you reach level 45 and then face the Innocence himself. Next boss is Kitava, 1600 life is enough to tank almost all of his abilities.
Once you arrive in act 6, check your resistances. If they're below 50%, you should pick up Purity of Elements from Clarissa (act 3) - use it instead of Grace aura until you solve the resistance problem. It's recommended to have at least cold and lightning capped before the final boss.
Act 7 shouldn't give you any troubles outside of boss fights and spooky ghosts inside Crypt. Progress easily, collect all passive points and before you descend to Temple of Decay - you should face Izaro inside cruel Labyrith. Don't forget to respec Bleed chance nodes after ascenda. Now you're ready to face Arakaali.
Act 8 should be a piece of cake, every single fight (yes, even Doedre). It's good to have freeze removal flask for Lunaris area, in case you don't have it already. Defeat the final boss of this act and proceed to Blood Acqueducts.
Preparing for maps
The area with a long stream of blood is where you'll spend next 1-2 hours. It's a great place to farm experience, i recommend staying there until level 68-70. Look for gear upgrades and slowly adjust your gems to recommended final setups.
You should start looking out for 5-link body armour OR Tabula Rasa which you can farm in Blood Acqueducts. You'll probably end up buying, either the armour or the remaining Humility cards. The gem setup socketed inside should be:
Rain of Arrows - Chance To Bleed - Brutality - Vicious Projectiles - Deadly Ailments
6th link (Tabula): Puncture
You should also try to find/craft/buy a bow with higher damage and attack speed than your current one. There are two amazing and cheap unique options:
- Reach of the Council
- Lioneye's Glare
In case they're out of your price range or unavailable at all (first day of the league / SSF), just craft or buy an Imperial bow with at least 200 max physical damage. You cannot find one in acqueducts, but you can buy it from Irasha starting from level 66.
Once you're ready, go on and finish the storyline. Act 9 should be really easy. The monsters in act 10 hit quite hard so make sure to have a Jade/Stibnite flask for defence. It is a good idea to finish merciless Labyrinth before Kitava. 4000 life is enough to not get one-shot in both fights, might be a little hard to acquire tho.
Mapping Progression
If you're here, i'm assuming you have at least a 5-link AND/OR decent physical bow. Preferably both, but just one one them is enough for smooth experience.
White maps
Passive Tree Progression (level 80)
They shouldn't be a problem at all. Most map mods are trivial, running them blue is completely viable. No real danger outside of few bosses. The best of all, the equipment you acquired before Kitava is enough to easily kill everything. You have 3 very simple goals for this map tier
- 5-linked bow with high physical damage
- Upgrade your gear that's not a bow (Life and Resistances)
- Level up as much as you can.
If you haven't bought a bow with high physical damage, then it's finally time to do so. Cost of 5-linking it should be low. Simply buying Jeweller's Touch prophecy should do the trick.
There's nothing in particular besides this. You should prepare for what's to come in the next map tier.
Yellow maps
Passive Tree Progression (level 90)
This is where you'll spend quite a lot of time, recommended level is 80-90. This map tier isn't too risky, but some map mods might be deadly without proper defences/damage.
Gear goals for this tier:
- Ryslatha's Coil
- 6-linked body armour
- Amulet annointment
- General gear upgrades
Ryslatha's Coil is one of the most important parts of the build. Gives insane amount of effective damage and decent chunk of life. Try to get one with as much life and maximum physical roll. Unfortunately it's quite expensive due to rarity.
Acquiring 6-link armour shouldn't be too taxing. Simply buy a good base and craft it with Greed essences or chaos spam. There's also a high chance you can find a good corrupted rare with right socket colors. For convenience it's GGGRRB for single target setup.
It's worth mentioning amulet annointments. It's a relatively cheap yet very strong upgrade. Make sure your amulet is quite good before you use the oils.
Of course, with such major changes to the build you should also adjust your other gear. Never stop looking for upgrades.
Red maps
Passive Tree Progression (level 94)
That's where mapping becomes tough. Defences has worse effectiveness, monsters can hit hard, map bosses become tanky. Your damage should carry you through most maps easily, but the bosses combined with some map mods can be too scary. The build should be fully functional at this point and all you can do now is improve it to be faster and stronger.
There are 3 following goals for map tier:
- Elder Bleed Bow
- End game build
- Min-maxing gear, self-crafting equipment
The bow is one of the obvious things to upgrade. It will take big amount of money to craft one, so you can postpone it for as long as you want to. 6-linking the bow should also be a part of your plan. Again, all details how to make one can be found in crafting section.
End game version of the build is something you should check out. It has optional QoL and/or damage upgrades. It also contains classic version of the build. You can find the details in section below.
Lastly, general gear upgrades. It's all min-maxing at this point. I cannot tell what combination you should run as it all depends on your current and future gear. Overall, fossil crafted gear can massively increase your damage.
After that, all you can do now is enjoy the build, kill some end game bosses and look for another build you want to play.
Nov
Path of Exile Lore - Part One
Path of Exile has been running for many seasons, and many players are deeply interested in the story behind Wraeclast. Here is an official questions and answers about the poe lore:
Nov
PoE New Stash Tab Systems
The tab system of Path of Exile will usher in unprecedented changes. Now you can add a folder containing multiple tabs and set multiple affinities type for a single tab.
![[3.12] PoE Heist Assassin Blade Blast Shadow Starter Build (PC,PS4,Xbox,Mobile)](https://dhost1.mmomiss.com/uploads/202011/thumb_PoE Heist Assassin Blade Blast Shadow Starter Build.jpg)
Nov
[3.12] PoE Heist Assassin Blade Blast Shadow Starter Build (PC,PS4,Xbox,Mobile)
This PoE 3.12 Heist Assassin Starter Blade Blast Build have enough damage to decimate end game bosses and clear maps extremely quickly. What's more, it is very friendly to starter.
Oct
PoE 3.13 Delayed Until January and Flashback Return?
The next league will be postponed to January next year. In December we will usher in the long-lost flashback event maybe.
Oct
PoE 3.12 Heist Useful Tips
PoE 3.12 Heist has been released for more than a month, do you like this heist theme? Poecurrency prepared this PoE 3.12 Heist Useful Tips guide for players, hoping it helps you! !
Oct
PoE 3.12 Champion Earthshatter Duelist Tank Build - Get Your Flashback Event Prizes
This PoE 3.12 Heist Champion Earthshatter Tank Build build is easy to start and SSF available. Good tankness allows you to easily complete the leveling and get the Mayhem prize you want.