[POE 3.6 Witch] Best Synthesis ARC Elementalist Build (PC,PS4,Xbox) - Safe, Cheap, Immune Reflect
This PoE 3.6 Synthesis ARC Elementalist Build provide a well-balanced caster build for beginners and veterans alike that scales well into endgame, has great mapping consistency and can even be played selffound.
![[POE 3.6 Witch] Best Synthesis ARC Elementalist Build (PC,PS4,Xbox) - Safe, Cheap, Immune Reflect](https://dhost1.mmomiss.com/uploads/201902/PoE_Synthesis_ARC_Elementalist_Build.gif)
Quick Jump
Pros & Cons
Pros
- + cheap & fully SSF-capable
- + smooth gameplay & progression
- + capable to do all content & mapmods
- + immune to all kinds of reflected damage
- + fairly safe, lots of damage reductions & ranged playstyle
Cons
- - not made for facetanking, physical damage hurts
- - good boss damage requires some investment
- - Lightning has a huge damage range
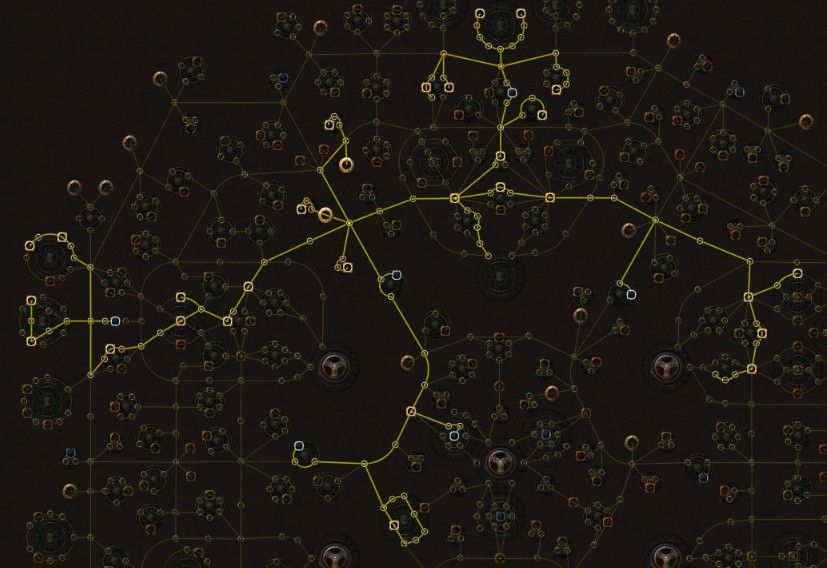
Skill Tree
Ascendancy
- Paragon of Calamity (Normal)
- Shaper of Desolation (Cruel)
- Beacon of Ruin (Merciless)
- Liege of the Primordial (Eternal)
Pantheons
- Soul of Solaris (Major): Overall great damage mitigation, try to unlock the extra powers asap.
- Soul of Gruthkul (Minor): Additional physical mitigation is always good to have.
- Soul of Shakari (Minor): Additional chaos damage mitigation. Upgrade saves a flask suffix.
Passive Tree

Gems Setup
This is the endgame setup, for Act 1-10 check out the Leveling Section!
Move the mouse on the bold poe skill gems to see needed mod
Arc, Spell Echo, Controlled Destruction, Lightning Penetration, Added Lightning Damage, Hypothermia
Arc is our main skill - it comes with high base damage, decent cast time, shock chance & -effect and a more damage modifier for each remaining chain. This simply means that if for example your Arc can chain 7x and there's nothing to chain to, then it will get a 105% (7*15%) more damage multiplier for that hit.
We can also use Vaal Arc, which grants both the regular Arc skill and a buffed up Vaal Arc that grants us the Lucky Buff. This buff counters our high lightning damage range by rolling each damage roll twice and taking the higher one. However, it can still happen that it rolls two low values and you end up getting a few small hits.
Instead of artificially inflating tooltip numbers, our support gem setup is laid out for the highest real damage output. Here's a summary of what each support does, in order of importance
Spell Echo substantially boosts our cast speed and repeats each skill use without consuming mana for the repeated cast, all at the cost of a minimal damage penalty.
Controlled Destruction is a straight up more multiplier with a crit chance penalty for the linked skill. This reduces our probability to proc Elemental Overload with Arc to the base 5%, but doesn't affect any other skills we can use to proc it.
Lightning Penetration is a "hidden" damage increase - it doesn't directly affect our tooltip damage, but rather acts as a dynamic more multiplier by reducing the enemies lightning resistance during damage calculations, and can even drop it into negative values.
Added Lightning Damage adds lots of flat lightning damage at 90% value due to Arcs damage effectiveness. Replace this with a Lv4 Empower if you have a +1 to Level of socketed Gems chest.
Hypothermia is another damage increase that's not represented in our tooltip. It gives a huge more multiplier against chilled enemies while also buffing the effect and duration of our chills.
To reliably make use of this, we need Beacon of Ruin and atleast 1 cold damage dealt with Arc, which we can gain through gear or jewels. Due to that, it's our 6th link choice.
Storm Brand, Arcane Surge, Increased Duration, Mana Leech
Storm Brand is a great tool for us to proc Elemental Overload by creating many individual hits on a relatively large duration. We also use it to proc Arcane Surge, a buff that grants a more Spell Damage multiplier, cast speed and mana regeneration.
Increased Duration increases both Storm Brands and Arcane Surges duration.
Mana Leech backs up our mana sustain.
Arcane Surge procs based on total mana spent with the linked spell. To reliably proc it with every cast you need to keep it at whatever your mana cost allows, usually Lv6!
Cast when Damage taken, Immortal Call, Cold Snap, Increased Duration
Cast when Damage taken (CwDt) is a trigger gem which will proc all linked spells after reaching a certain treshold of damage received, as long as the spells are within the level limitation.
This doesn't refer to the spells gem level, but rather its required level - in our case max. Lv38.
Immortal Call helps surviving physical damage by temporarily giving us physical immunity. Ignore the Endurance Charge part, it has a base duration and works even without charges!
Cold Snap helps with chilling in maps with the Chance to avoid Elemental Ailments mod, and occasionally grants Frenzy Charges. Increased Duration maximizes their duration.
Keep CwDt at Lv1, Immortal Call at Lv3 and Cold Snap at Lv7 for consistent procs!
Leap Slam / Whirling Blades, Faster Attacks, Fortify, Flame Dash
Two different movement skill setups, which one to use depends on your weapon choices.
Leap Slam is for Sceptre users and allows for relatively fast movement while also being able to pass obstacles on its own.
Whirling Blades is for Dagger users and gets insanely fast with enough Attack Speed scaling, but can't pass obstacles.
Faster Attacks increases their speed,
Fortify grants a buff on hit that reduces all incoming damage from hits by 20%.
Flame Dash is just meant a backup movement skill, mostly interesting for Dagger users to be able to pass obstacles or avoiding taking any damage from ground effects.
Clarity, Enfeeble, Cast when Damage taken
Clarity helps sustaining mana for skill usage costs and Mind over Matter by adding flat mana regeneration to our base amount, which then gets multiplied by all respective % modifiers.
Unlike other auras, it reserves a flat amount of mana which is dependent on its gem level, keep it at a level where you're comfortable with the reservation cost compared to regeneration gain.
Enfeeble curses the enemy with a debuff that greatly reduces their damage as well as hit- and crit rate. We link it to another Cast when Damage taken to automate casting.
Keep CwDt at Lv7 and Enfeeble at Lv10 for a good proc/effect ratio!
Decoy Totem, Summon Lightning Golem, Minion and Totem Elemental Resistance
Decoy Totem uses a taunt skill, that with a good rhythm can prevent you from getting hit at all in the majority of bossfights. Shaper, Elder and their guardians can't be taunted!
Summon Lightning Golem grants us a companion that boosts our attack- & cast speed and occasionally casts a mini-Wrath aura, giving us some flat lightning damage.
Minion and Totem Elemental Resistance helps both of them surviving, you can also consider switching this with Empower to raise their base life.
Decoy Totem, Summon Lightning Golem, Summon Flame Golem
After you finish the Eternal Lab and spec into Liege of the Primordial, you're able to summon a second golem. The best choice is Summon Flame Golem, which grants a generic damage buff and being an elemental golem, is also immune to elemental damage with Liege of the Primordial.
Gear
Here's some important info about gear in this build
- Rare items can have up to six affixes, split into three prefixes and three suffixes
- Item level decides which affixes can roll, and up to which tier
- Shaper/Elder items can roll special affixes, those are accordingly colored in this section
- Socket color probability is tied to the attribute requirement: Strength, Dexterity, Intelligence
- 20% Quality increases the probability to hit the maximum possible number of sockets and links
- Affixes saying "with/to attacks" don't affect Arc, flat damage on weapons only if it's "to Spells"
- Stack Cast Speed until you reach 5 casts per second, after that focus on other damage affixes
- Armour, Evasion and Energy Shield can be ignored, all we care about is Life and Mana
- We need 37 Dexterity from gear to meet some support gems attribute requirements
- League-specific affixes (currently Fossils) are not included. They're usually tied to higher end crafts, once you can afford that you should be able to tell which ones synergize with this build
Leveling
This section will help you while playing through the storyline and shows the recommended passive tree progression, gem setups, quest progression and exp farming zone for each act. Keep in mind that it may also include some major storyline spoilers, if you care about that.
If you want to explore zones or do quests not mentioned here, or even want to level with a completely different skill then do that, this section is just an aid.
Act 1
- Get Arcane Surge (keep it Lv1 for now!) from Large Chest and kill Hillock
- Get Freezing Pulse, link it with Arcane Surge and throw away Fireball
- Start looking out for a 3-linked, all blue socket Wand or Sceptre
- Get the Coast Waypoint, kill Hailrake on Tidal Island and get Quicksilver Flask in town
- Enter Submerged Passage, look for Flooded Depths and kill the Dweller of the Deep
- Get Orb of Storms and Passive Skillpoint in town
- Enter Prison, get Added Lightning Damage and link it to Freezing Pulse + Arcane Surge
- Start looking out for 2x Sapphire Rings
- Complete Trial of Ascendancy in Lower Prison
- Kill Brutus, progress to Ship Graveyard and get the Waypoint
- Look for Ship Graveyard Cave, get Allflame then get Cavern of Wrath Waypoint
- Travel to Ship Graveyard Waypoint and kill Fairgraves
- Go to town to get Passive Skillpoint, Clarity, Flame Dash & Arc
- Throw away Freezing Pulse and craft a +1 Lightning Gem Wand/Sceptre
- Put Arc + Arcane Surge + Added Lightning Damage in there
- If needed, the recipe for Topaz Rings is Iron Ring + Green Skill Gem
- Equip Sapphire Rings and kill Merveil
Exp Farming Zone: The Ledge
Act 2
- Once in town, enter the Old Fields first
- Start looking out for 2x Topaz Rings
- Look for the Den, kill Great White Beast and get second Quicksilver in town
- Continue to Crossroads and get Waypoint
- Enter Chamber of Sins, complete Trial of Ascendancy on Level 2 and kill Fidelitas
- Go back to Crossroads, enter Broken Bridge and kill Kraityn
- Back to Crossroads once more, enter Fellshrine Ruins and Crypt
- Complete Trial of Ascendancy in Crypt
- Back to town, enter Riverways and get the Waypoint
- Go to Western Forest, kill Alira & Captain Arteri
- Look for Weaver's Chambers and kill Weaver
- Back in town, get Controlled Destruction and replace Arcane Surge with it
- Link Arcane Surge to Orb of Storms
- You may now start leveling Arcane Surge, keep its treshold below Orb of Storms' mana cost
- Enter Lioneye's Watch and get Passive Skillpoint
- Go back to Riverways, enter Wetlands, kill Oak and get Waypoint
- Get two Passive Skillpoints from Eramir in town
- Make your way to the Ancient Pyramid, equip Topaz Rings and kill Vaal Oversoul
Exp Farming Zone: The Northern Forest
Act 3
- Start looking out for 4-linked Intelligence-based or Hybrid (Int + other stat) gear
- Kill the Blackguards in City of Sarn and enter town
- Go to Slums, enter Crematorium, finish Trial of Ascendancy and kill Piety
- Get Sewer Key in town
- Go back to Slums, enter Sewers, get Waypoint, find three busts and get skillpoint in town
- Get Marketplace Waypoint and finish Trial of Ascendancy in Catacombs
- Enter Battlefront, get Waypoint and kill Captain Aurelianus
- Go to Docks and get Thaumetic Sulphite
- Back to Battlefront, enter Solaris Temple and talk to Lady Dialla
- Destroy the Undying Blockade in Sewers
- Enter Ebony Barracks, get Waypoint and kill General Gravicius
- Enter Lunaris Temple, kill Piety and get Skillpoint in town
- Get Imperial Gardens Waypoint and finish Trial of Ascendancy
- Go to Library and finish Siosa's quest
- You can now buy all unlocked gems at Siosa (currency needs to be in bag!)
- Get Lightning Penetration from Siosa and replace Added Lightning Damage with it
- Also get Decoy Totem and Mana Leech from Siosa
- Link Mana Leech to Orb of Storms
- Enter the Sceptre of God and kill Dominus
Exp Farming Zone: The Docks
Act 4
- Enter the Dried Lake, kill Voll and enter the Mines
- Free Deshret's Spirit in Mines Level 2, progress to Crystal Veins and get Waypoint
- Get Passive Skillpoint and Summon Lightning Golem in town and optionally farm Dried Lake
- Complete the first Labyrinth, you can enter it through the Sarn Encampment
- Read up on the Lord's Labyrinth and Izaro to get an idea what's going on
- After finishing the Labyrinth, ascend to Elementalist and get Paragon of Calamity
- Go back to Crystal Veins, enter Kaom's Dream and kill Kaom
- Now enter Daresso's Dream and kill Daresso
- Get Spell Echo from Dialla and buy Cast when Damage taken in town
- Put your Arc setup into a 4L and add Spell Echo
- Replace your now-outdated weapon with a good sceptre, the Spell Damage recipe can help
- Get Enfeeble in Act 3 and add it to CwDt (keep CwDt Lv7 and Enfeeble Lv10!)
- Also get Shield Charge and Faster Attacks in Act 3 and link them together
- Kill Piety in Belly of the Beast, and finally Malachai in the Harvest
Exp Farming Zone: The Dried Lake
Act 5
- Kill Overseer Krow and enter town
- Find the Miasmeter in Control Blocks and kill Justicar Casticus
- Get Silver Flask and Skillpoint in town
- Replace one Quicksilver Flask with Silver Flask and try to roll of Staunching on it
- Make your way to Templar Courts, kill Avarius and get a unique jewel in town
- Get Ruined Square Waypoint and optionally kill Utula to get Assassin's Haste in town
- Finish the quest in Reliquary and get Skillpoint in town
- Look for the Sign of Purity in Ossuary
- Kill Kitava on Cathedral Rooftop
- You will suffer a permanent -30% resistance penalty after this fight
Exp Farming Zone: The Chamber of Innocence
Act 6
- Clear the Twilight Strand to unlock Lilly as Skillgem Vendor
- Get Immortal Call and link it to CwDt (keep it at Lv3!)
- Get Increased Duration and link it to Orb of Storms + Arcane Surge
- Get Fortify and link it to Shield Charge + Faster Attacks
- Get to Mud Flats and kill the Dishonored Queen
- Enter Karui Fortress, kill Tukohama and get Skillpoint in town
- Finish Trial of Ascendancy in Prison and kill Shavronne
- Enter Prisoner's Gate, kill Abberath and get Skillpoint in town
- Get Riverways Waypoint
- Enter Wetlands, kill Puppet Mistress and get Skillpoint in town
- Light the Beacon and kill the Brine King
Exp Farming Zone: The Southern Forest
Act 7
- Find the Silver Locket in Broken Bridge and get Basalt Flask in town
- Replace one Life Flask with Basalt Flask
- Enter Crossroads, get Waypoint then enter Crypt through Fellshrine Ruins
- Finish Trial of Ascendancy and find Maligaro's Map
- Go back to Crossroads and enter Chamber of Sins
- Kill Maligaro in Maligaro's Sanctum
- Finish Trial of Ascendancy in Chamber of Sins Level 2 and enter the Den
- Make your way to Ashen Fields and kill Greust, then get Skillpoint in town
- Get Northern Forest Waypoint and enter Dread Thicket
- Collect all Fireflies and kill Gruthkul, then get Skillpoint in town
- Find Kishara's Star in Causeway and get Skillpoint in town
- Get the Vaal City Waypoint, enter Temple of Decay and go back to town
- Finish the second Labyrinth and get Shaper of Desolation
- Get back to the Temple of Decay and kill Arakaali
Exp Farming Zone: The Northern Forest
Act 8
- Enter the Toxic Conduits and kill Doedre
- Go for Quay first, find Ankh of Eternity, kill Tolman and get Skillpoint in town
- Kill the Gemling Legionnaires in Grain Gate and get Skillpoint in town
- Enter Solaris Temple, get Sun Orb then enter Solaris Concourse and get Waypoint
- Go back to Doedre's Cesspool and go for the Grand Promenade now
- Get Bath House Waypoint and finish Trial of Ascendancy
- Enter High Gardens, kill Yugul and get Skillpoint in town
- Enter Lunaris Temple through Lunaris Concourse and get Moon Orb
- Go to Harbour Bridge and kill Solaris & Lunaris
Exp Farming Zone: The Harbour Bridge
Act 9
- Find the Storm Blade in Vastiri Desert and speak to Petarus & Vanja in town
- Look for a blocked entrance in Vastiri Desert
- Go to town, talk to Sin and then to Petarus & Vanja
- Kill Shakari and get Skillpoint in town
- Get Foothills Waypoint, enter Boiling Lake and get Basilisk Acid
- Enter the Tunnel and finish Trial of Ascendancy
- Get Quarry Waypoint, enter Refinery and get Trarthan Powder
- Go back to Quarry and kill Garukhan and get Sekhema Feather
- Go to town and give the feather to either Tasuni or Irasha, get Skillpoint
- Enter Belly of the Beast and kill the Depraved Trinity
Exp Farming Zone: The Blood Aqueduct
Act 10
- Go left on Cathedral Rooftop and kill Plaguewing
- Get Sulphur Flask in town, replace Quicksilver Flask with it
- Go back to Cathedral Rooftop
- Now go right, enter the Ravaged Square and go south
- Enter the Control Blocks, kill Vilenta and get Skillpoint in town
- Optionally find the Teardrop in Reliquary
- Go back to Ravaged Square and get its Waypoint in the upper part
- Enter Ossuary, complete Trial of Ascendancy and get Elixir of Allure
- Get to Desecrated Chamber through Torched Courts and kill Avarius
- Finish the third Labyrinth and get Beacon of Ruin, if this is too hard then keep it for later
- Enter the Canals and make your way to the final bossfight
- You will suffer another permanent -30% resistance penalty after this fight
Exp Farming Zone: The Desecrated Chambers
Epilogue
- Talk to Lani for two Skillpoints
- Enter Templar Laboratory and get a map from Zana, then buy all maps she's selling
- That's it, you've reached the endgame! Gear up and switch to the endgame gem setup
- Optionally farm yourself a Tabula Rasa through Humility cards in Blood Aqueduct

Feb
POE 3.6 Synthesis Cospri's Malice Shadow COC Build
In the POE 3.5 League, the official of PoE had reworked Cast On Critical Strike Support(abbreviate to COC). Its CD changed from 0.5s to 0.15s and its frequency increased from 2/s to 6.6/s. So fundamentally COC has become a new game mechanism. Many players have chose kinds of COC builds in gameplay.
![[POE 3.6 Duelist] Best Synthesis Ngamahu Cyclone Slayer Build (PC,PS4,Xbox) - Fast, Immune, High life Regen](https://dhost1.mmomiss.com/uploads/201902/thumb_POE_Synthesis_Duelist_Ngamahu_Cyclone_Slayer_Build.gif)
Feb
[POE 3.6 Duelist] Best Synthesis Ngamahu Cyclone Slayer Build (PC,PS4,Xbox) - Fast, Immune, High life Regen
This build POE 3.6 Synthesis Ngamahu Cyclone Slayer Build need Ngamahu's Flame as our weapon: Melee hits with Ngamahu's Flame have a chance to trigger level 16 Molten Burst
![[POE 3.6 Ranger] Best Synthesis Molten Strike Raider Build (PC,PS4,Xbox) - Cheap, Tanky, League Starter](https://dhost1.mmomiss.com/uploads/201902/thumb_POE_Synthesis_Ranger_Molten_Strike_Raider_Build.gif)
Feb
[POE 3.6 Ranger] Best Synthesis Molten Strike Raider Build (PC,PS4,Xbox) - Cheap, Tanky, League Starter
Molten Strike is an attack skill consisting of two parts: an initial melee attack hit and a projectile attack. This build is easily started at the beginning of league and starts out cheap and powerful with extreme end game scaling available with investment as the league goes on.
![[POE 3.6 Tempar] Best Synthesis Righteous Fire Guardian Build (PC,PS4,Xbox) - Cheap, HC & SC, League Starter](https://dhost1.mmomiss.com/uploads/201902/thumb_POE_Tempar_Synthesis_Righteous_Fire_Guardian_Build.gif)
Feb
[POE 3.6 Tempar] Best Synthesis Righteous Fire Guardian Build (PC,PS4,Xbox) - Cheap, HC & SC, League Starter
This POE 3.6 Synthesis Righteous Fire Guardian Build can do: shaper, dried lake (most), normal hillock, minotaur/chimera/phoenix/hydra/t15s/atziri/uber atziri/not hogm cause culling/sarn encampment ONLY CRUEL THO and probably hideout viable

Feb
POE 3.6 News About Aura and Jewel
From mew information of 3.6 version of the official, we find a new jewel, which comes with 0.2% of spell damage leeched as energy shield. It is a built-in mod.
![[POE 3.6 Tempar] Best Synthesis Elemental Hit Hierophant Build (PC,PS4,Xbox) - Safe, Cheap, Great Clearspeed](https://dhost1.mmomiss.com/uploads/201902/thumb_POE_Synthesis_Elemental_Hit_Hierophant_Build.gif)
Feb
[POE 3.6 Tempar] Best Synthesis Elemental Hit Hierophant Build (PC,PS4,Xbox) - Safe, Cheap, Great Clearspeed
This POE 3.6 Synthesis Elemental Hit Hierophant Build have 9.6 million DPS at 6.3k life (high-end items = 12.5 million), 8 million DPS at 7.5k life (for HC). Can kill shaper within seconds and budget-friendly to get it started


 (
(


