(
(
POE 3.4 Marauder Berserker Starforge Ancestral Warchief Build - Easy to map & mod
"The savage path is always swift and sure"
The Berserker is geared towards being in the heat of combat, with many of their skills requiring killing or being hit recently. These bonuses include damage, life leech, and warcry enhancements.
The whole build is around the 2Handed Sword Starforge.
It gives us huge stats, like 20% Aoe (so we can easy play with conc effect all the time) +100 Life, over 700phys dmg and the best part "Your physical dmg can Shock" BUT it shocks not from itself so u still need "%chance to shock" wich we get through our jewels.

Pro:
- + All Maps and Mods are easypeasy
- + ~ 6k Life
- + 8,7k armor -> 46% phys reduction
- + 75% Chaos Res
- + over 400 Life/s
- + Physical can Shock
- + Immune to Bleed
- + Double Curse
Cons:
- - Still Totem Playstyle
- - No Movement Gem
Leveling
Ascendancy
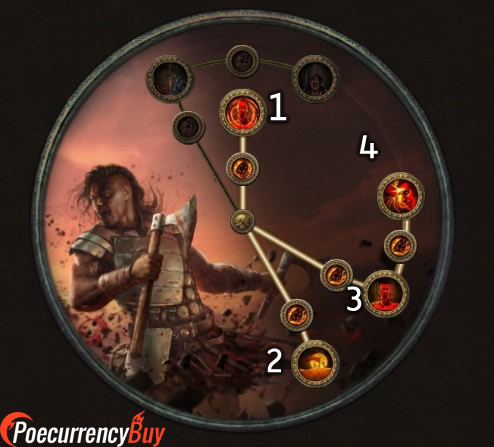
We take the Berserker Class for most DMG
First we go to War Bringer because this will be our main heal skill
After that we take the Aspect of Carnage and with the next 2 points from the Merc/Uber Lab we take Rite of Ruin to get the double bonus from our Rage stacks (picking Rite of Ruin at last helps us doing a smoother Ulab run for ourself, because of the lower degen from 5%. After the Ulab and Rite of Ruin we have 10% degen at max Rage stacks).
Bandits
help
Pantheon
Major: Soul of Brine King
Minor: Soul of Abberath
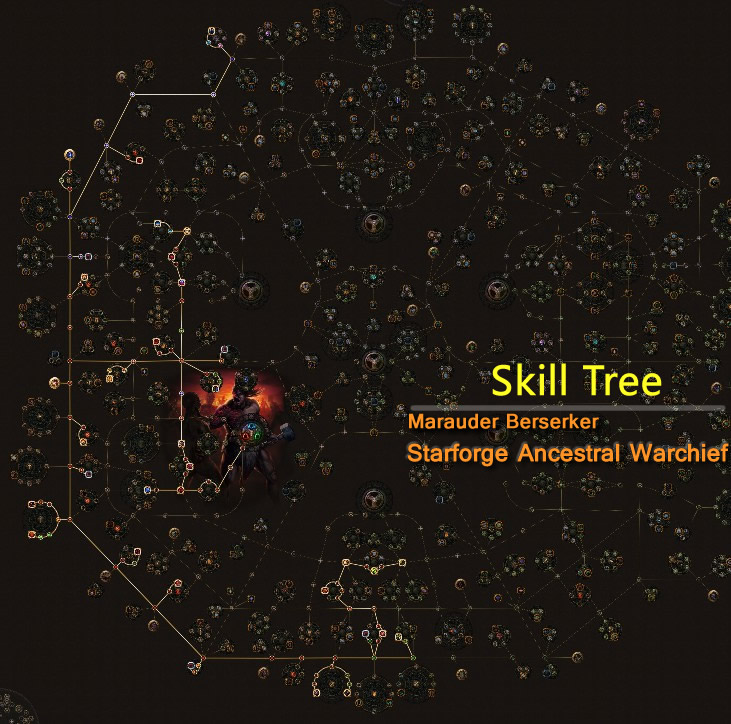
Skill Tree
Gems Links
Weapons: Poet's Pen
Colors: R-R-R-R-R-B
Gems: Ancestral Warchief -> Melee Damage -> Melee Damage on Full Life -> Maim -> Ruthless -> Concentrated Effect (Increased Area of Effect for even more range)
Helmets: Devoto's Devotion
Colors: B-B-G-G
Gems: Blasphemy, Vulnerability, Temporal Chains (if u want more dmg, go for Despair), Enhance lvl 4
Boots: Death's Door
Colors: R-R-G-R
Gems: Enduring Cry + Increased Duration, Vaal Haste, Blood Magic
Gloves: Legion Gloves
Colors: R-G-R-R
Gems: CWDT, Blood Rage, Immortal Call, Stone Golem
Gears
Overview

Weapon
The whole build is around the 2Handed Sword Starforge
It gives us huge stats, like 20% Aoe (so we can easy play with conc effect all the time) +100 Life, over 700phys dmg and the best part "Your physical dmg can Shock" BUT it shocks not from itself so u still need "%chance to shock" wich we get through our jewels. The "Malus" is that u cant deal elemental dmg, but thats not so bad because we can so switch offense auras for defensive ones or curses.
Helmets
Now we come to the "Devoto's Devotion" with a curse setup in it wich gives me a lot of offence stats for fast mapping (love the +% movement bonus).
Armour
Our Armour is the Kaom's Heart, wich gives us around 1,3k life
Boots
As Boots we take the "Death's Door" because it has all what u want :D Bleeding immune, allres, +1 endurance charge and good movement. We take our Healing Warcry gemsetup in it with Vaal Haste. this combined with Blood Magic Gem allow us to cast even if we have no mana:
Gloves
For the Gloves we take some with the res we need and high life. There we have our immortal Call/Blood Rage setup in it. this give us together with the "Soul of Arakaali" a huge life reg buff. and the Blood Rage gem at 20/20 gives us 20%aps wich is also nice.
Belt
The Belt is a Rare too with the Res we need and a high life roll
Rings
The Rings we use are 2x the "Ming's Heart" high for max chaos res and dmg. And a Lapis amulet for Int and same as the other rares: Life, res and a high flat phys roll is also nice
Jewwls
Our Jewels are a very importent setup for this Build, they give us the Stats we need (Dex) and our only chance to SHOCK for our Starforge. We take 5 Jewels, so come up to 25% Chance to Shock, wich is enough because our Totems hit very fast.
Flasks
And to the Last, the Flasks we use. A Life Flasks for Freeze immunity, the Lion's Roar (the knockback is great and it gives us a huge dmg bonus), Atziri's Promise (for even more Chaos dmg) and a Sin's Rebirth (for even MORE Chaos damage), and the last flask as you prefer
Enchantments
Helmet
For DMG:
- 40% increased Ancestral Warchief Totem Damage
- Ancestral Warchief Totem grants 30% increased Melee Damage while Active
- 30% increased Vulnerability Curse Effect
- For Defense:
- 30% increased Enduring Cry Cooldown Recovery Speed
- 36% increased Enduring Cry Buff Effect
- 30% increased Temporal Chains Curse Effect
- For Others:
- 12% increased Ancestral Warchief Totem Radius
Boots
For DMG:
- 10% chance to Freeze, Shock and Ignite if you haven't Crit Recently (wich is BIS with additional 10% chance to shock)
- For Defense:
- Regenerate 2.0% of Life and Mana per second if you were Hit Recently
- 8% chance to Dodge Spell Damage if you've taken Spell Damage Recently
- 10% Chance to Dodge if you've taken a Critical Strike Recently
- For Others:
- 10% increased Movement Speed if you haven't been Hit Recently
Gloves
For Defense:
- Cast Commandment of Reflection when Hit (because the clone takes some dmg for you)
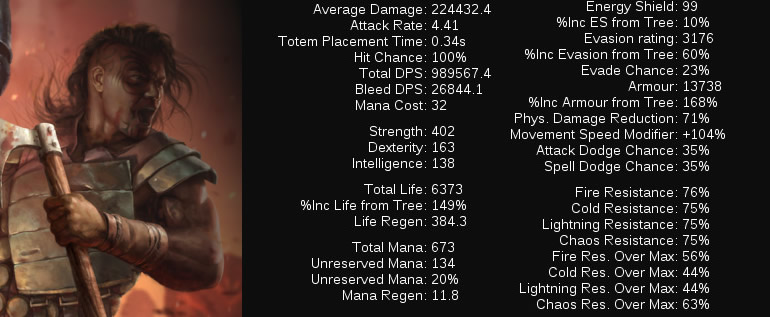
Expectations

Oct
POE 3.4 Ranger Build - Deadeye | Raider | Pathfinder
Ranger is a very popular class in Path of Exile. The following summarizes some of the most popular Ranger builds, these builds can be found on our website, I hope you have something you like!

Oct
POE 3.4 Guide: How to Find Hidden Paths
In theDelve, the label of the room will appear on the map, but there is no direct passage to go. This requires the use of torches and explosives to explore. But we have a way to rule out which roads are likely to lead to hidden rooms. This guide will show you how to quickly find the right path in limited possibilities.

Sep
POE 3.4 Templar Guardian Dominating Blow Build - High Physical Mitigation & Crazy Total DPS
This build go low life with 8-9 Auras. And also use a Host Chieftain and Carnage Chieftain to produce frenzy and power charges for us and our minions. Lastly a animated guardian gives us and our minions some nice damage and speed boosts.

Sep
POE 3.4 Ranger Pathfinder Herald of Agony Build - High Dps & League Starter
This is a summoner build maximizing the damage of the Agony Crawler. Agony Crawler comes from the skill Herald of Agony

Sep
POE 3.4 Shadow Saboteur Remote Mine Arc Build - High damage & Needn't Aim
Remote Mine is a support gem that modifies the supported skill so that instead of casting it directly, the player lays a mine. A detonation skill then becomes available, which can be used to detonate the mine. That's why we can get high damage on single target in this build. What's more, this build have high clear speed and no need to aim!

Sep
POE 3.4 Scion Ascendant Molten Strike Build - High Damage & Stun Immunity
This build uses unique items to scale int for easy ES and HOWA damage. The tree is flexible to play spectral throw or bladeflurry but molten strike can get much higher damage with extra projectiles.